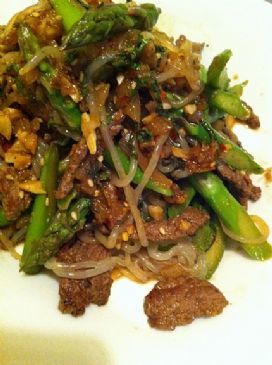
HCG Phase 2 & 3 – Spicy Beef and Asparagus with Miracle Noodles

HCG Phase 3 - Spicy Buffalo and Asparagus with Miracle Noodles

Ingredients

  • 100 grams beef tenderloin
  • 1/4 cup diced onions
  • .5 tbs chopped garlic
  • 2 tsp graded fresh ginger
  • 1 cup slivered asparagus
  • 1/4 cup low sodium chicken broth
  • 1 tbs low sodium soy sauce
  • 1/4 tsp red pepper chili flake
  • .5 tsp toasted sesame seeds
  • 1 tbs fresh chopped basil or cilantro
  • 1 tsp extra coconut oil
  • 1 bag of angel hair Miracle Noodles

Directions

Put on a pot of water so it will be boiling by the time you are ready to cook them.

Prepare your mise en place of the listed ingredients.

Heat up a 14-inch non-stick saute pan add 1 tsp extra coconu oil. Saute the meat until it starts browning on both sides then add the onion saute until softened. Add the garlic and ginger and stir in the sesame seeds. Add the chicken broth and soy sauce bring it up to a high simmer and add the prepped Magic Noodles as described below. Sprinkle with chili flake and stir some more. Ad entire mixture to bowl and serve hot.

Prep the Magic Noodles (boil for 1 minute, then drained, rinsed and pat dry)

Number of Servings: 1

hCG Diet Southwest Egg Bake

Hcg Diet Journey: Phase 3 Egg Casserole

Southwest Egg Bake

Awesome brekkie recipe because it does not contain any starches. Serves 6-8.

Ingredients

  • 4 eggs
  • 4 egg whites
  • ¼ tsp cayenne pepper
  • ½ red bell pepper, diced
  • ½ green bell pepper, diced
  • ½ medium white onion, diced
  • 6 strips turkey bacon, chopped
  • 1 can diced tomatoes with green chilies, drained
  • ¾ cup pepper cheese, grated
  • sour cream (to taste)

Instructions

  1. Whisk eggs and egg whites with cayenne in a bowl. Set aside.
  2. Sauté the peppers, onions and bacon in a pan until veggies are tender and turkey bacon is cooked.
  3. Combine egg mixture, pepper mixture, canned tomatoes, and cheese in a baking dish.
  4. Bake at 260 degrees for 35-45 minutes or until inserted knife comes out clean.
  5. Serve topped with sliced avocado, sour cream, and hot sauce to taste.

hCG Diet Phase 2 Lemon Rosemary Chicken

Lemon Rosemary Chicken

Ingredients and Method

– 100 g chicken
– Juice of 1 lemon, divided
– Poultry seasoning
– 1 tablespoon fresh rosemary, chopped
– Salt & pepper, to taste
– Zest of 1 lemon


Marinate chicken in 1/2 of the lemon juice. Season the chicken with poultry seasoning, rosemary, salt and fresh ground pepper.

Grill the chicken in a shallow pan on the stove top until cooked through. Top with lemon zest and additional salt & pepper if desired.

Counts as: 1 protein serving.

hCG Homemade Kombucha That’s Easy And Cheap

Recipe:

  • 4-8 bags of black tea or 4-8 teaspoons of loose leaf black tea
  • 1 gallon of water
  • 1 cup organic cane sugar 
  • 2 SCOBYs (you can take one and split it or cut it – they’re layered almost like a bunch of pancakes)
  • 1-2 cups starter tea from previous batch

Instructions:

  1. If you bought your SCOBY, follow the instructions given to you to start your homemade kombucha.
  2. Bring to boil a gallon of water. I just pour 2 half gallon mason jars’ worth of water into my stock pot so I don’t have to bother with actually measuring anything.
  3. Add sugar and stir until dissolved. Add tea and remove from heat to cool. Too hot of tea will kill your SCOBY. My mom puts her pot out in the snow sometimes to cool off quicker. If you’re concerned about caffeine you can steep your tea for 30-60 seconds in a cup of hot water before putting in with your sugar water.
  4. Take your starter tea and swirl it around your half gallon mason jars and let it settle in the bottom. The starter tea is acidic and will help your new tea become acidic enough so mold does not grow on your SCOBY. It will act as sort of an all-natural disinfectant.
  5. When tea has cooled enough, pour it into your mason jars with your starter tea. I usually will wait several hours until I can hold my finger in my tea brew.
  6. Place your SCOBY on top of tea and securely cover with thin cloth or paper towel. Your SCOBY will float all over the place as it ferments. The fermentation process is aerobic and needs the air to do its duty. Don’t use anything like cheesecloth because those pesky fruit flies will be able to get into your brew.
  7. Place mason jars in a corner of your kitchen without direct sunlight and let it ferment for several days. The hotter your house is the faster it will ferment.
  8. Start tasting your kombucha on the 4th day to see if it has reached the right balance of sweet and tart. I let my kombucha ferment for about 5 days in the summer and about 7 in the winter. The longer you let it ferment, the less sugar your kombucha will have but it will turn and taste progressively more like vinegar. Ain’t nobody want to drink that.
  9. After your kombucha has reached the right balance of sweetness, start making another batch of tea (steps 1-3), take your SCOBY out and put it on a plate, strain your kombucha while pouring it into another mason jar. Keep about 2 cups for your starter tea! Put the lid on the finished kombucha and put it in the fridge.
  10. Using your new starter tea, repeat steps 4-9.

Flavoring your homemade kombucha (aka second ferment) which is optional:

  1. After your first ferment (when your kombucha is the right taste), take your SCOBY out and put it on a plate. Then add your flavoring!
  2. For flavoring you can add fruit juice, fresh fruit, frozen fruit, dried fruit, spices, herbs, and whatever else you can think of. This is the time to experiment!
  3. Cover jars with a lid and put it back in the corner of your kitchen for another couple of days. Covering your jars produces carbonation because the carbon dioxide (made from the yeast eating the sugar) can’t escape. Don’t let it go too long with covered jars in case of exploding glass. We leave ours for about 4 days.

Tah dah! You have finished your first successful batch of homemade kombucha! You’re now officially a hippie.

A SCOBY is a syntrophic mixed culture of yeast and bacteria used in production of several traditional foods and beverages

hCG Diet Phase 3 Recipe: Tropical Fruit Salad

Because of the high sugar content, the sweeter fruits are only allowed in the 2nd 3 weeks of the hCG maintenance. 

This fresh, healthy fruit salad is perfect for summer!  You can make-and-take this recipe to a party or event without anyone even knowing it’s a lower-carb “diet” recipe.

Ingredients

  • 1 kiwi fruit
  • ½ cup grapes
  • ¼ cup pineapple
  • ¼ cup honeydew melon
  • ¼ cup watermelon (seedless is preferred)
  • 1 small apple (any variety)
  • 1-2 packets powdered stevia
  • 1 tbsp all-natural orange juice*

Instructions

  1. To start making this recipe, you’ll need a sharp knife and a cutting board.
  2. Peel skin off the kiwi, slice into ¼-inch slices, add to a large bowl.
  3. Slice grape in half (if desired), add to bowl. 
  4. Peel, core, and chop the pineapple into 1-inch pieces, add to bowl.
  5. Slice, remove rind and seeds of honeydew melon, chop into 1-inch pieces, add to bowl.
  6. Slice, remove rind and seeds of watermelon, chop into 1-inch pieces, add to bowl. 
  7. Peel, remove the core, and dice the apple into ½-inch pieces, add to bowl.
  8. Sprinkle with the stevia packet(s) while stirring together.
  9. Slowly pour the orange juice over the mixture and stir again.
  10. Cover with lid (or clear plastic wrap) and place in the fridge for at least 1 hour to let the fruit combine and become juicy.*
  11. Remove from fridge and enjoy! 

Recipe Notes

This recipe makes 4 servings. To make this recipe for lunches, simply divide the recipe into small, individual storage containers with lids, cover, and place in fridge until ready to eat.

*Orange juice that is all-natural should not contain any added sugars. If you are not patient enough to wait for the fruit to settle in the refrigerator, just omit the orange juice from the recipe.

hCG Green Jasmine-Mint Iced Tea With Lemon

  • PREP TIME 10 minutes
  • TOTAL TIME 2 hours 10 minutes

RECIPE HIGHLIGHTS

NUTRITIONAL INFORMATION

Makes: 8 servings, about 1 cup each

  • Calories46
  • Fat0 g
  • Saturated fat0 g
  • Mono Fat0 g
  • Cholesterol0 mg
  • Carbohydrates13 g
  • Dietary fiber0 g
  • Protein0 g
  • Sodium5 mg
  • Sugars12 g
  • Potassium39 mg

Here we balance the mildly grassy flavor and slightly astringent mouthfeel of green tea with honey and lemon. Oversteeped green tea can be bitter, so don’t brew it any longer than 3 minutes. And be sure to steep in simmering water: water that looks like it’s steaming, with little bubbles, but not boiling.

INGREDIENTS

  • 1/4 cup loose green jasmine tea, or 12 green jasmine tea bags
  • 1/2 cup fresh mint leaves, plus more whole sprigs for garnish
  • 4 cups simmering water
  • 1/2 cup lemon juice
  • 1/3 cup honey
  • 4 cups cold water

INSTRUCTIONS

  1. Steep loose tea (or tea bags) and mint leaves in simmering (not boiling) water for 2 to 3 minutes.
  2. Strain the tea (or remove tea bags and mint leaves) and pour into a large pitcher. Stir in lemon juice and honey until the honey is dissolved. Add cold water. Refrigerate until chilled, about 2 hours. Serve over ice with mint sprigs, if desired.

hCG Diet Apricot Chicken

Ingredients:

  • 140g chicken breast
  • ½ lemon, juiced
  • 1tsp minced garlic
  • 2tbsp Dijon mustard
  • 1tbsp coconut oil
  • 2 apricots, remove the stone & chopped
  • ½ onion chopped
  • 2tbsp apple cider vinegar
  • ½ cup chicken stock
  • Salt & pepper to taste

Directions:

  1. Heat a pan (with a lid) over a medium heat.
  2. Add oil & chicken.
  3. Season with salt & pepper.
  4. Lightly brown the chicken a few minutes on each side.
  5. Add the onions & garlic & cook for 5 minutes.
  6. Add the vinegar & lemon juice to the pan & cook for 5 minutes.
  7. Add the apricots & stock, when the stock comes to a bubble, cover the pan & reduce heat & simmer 10-15 minutes.

Sweet And Crunchy Salad with Cottage Cheese and Mandarins – Bettabods Phase 2 Recipe

INGREDIENTS

  • 1 cup cottage cheese (100g per 3.5 oz) fat-free
  • 1 cup celery diced
  • 1 cup mandarin  diced
  • 1/16 tsp powdered stevia
  • 1/2 teaspoon cinnamon
  • 1/4 teaspoon nutmeg
  • 1 teaspoon vanilla extract

INSTRUCTIONS:

  1. Mix cottage cheese, stevia, cinnamon, nutmeg and vanilla in a medium bowl
  2. Fold in celery and clementines
  3. Serve chilled.

NOTE:

This salad can be made with any of the allowed fruits on the Bettabods Diet Protocol.

hCG Phase 3 and 4 Dairy-free Coconut Cream with Berries

Miss yogurt in the morning? Try these three delicious dairy-free options with berries and coconut flavor!

Ingredients

  • 100 ml coconut cream
  • 20 g fresh strawberries
  • 1 pinch vanilla extract
With Raspberries

  • 100 ml coconut cream
  • 20 g Fresh raspberries
  • 1 pinch vanilla extract
With Blueberries

  • 100 ml coconut cream
  • 50 g blueberries
  • 1 pinch vanilla extract

Instructions

  1. Mix together with a stick blender.

hCG Phase 2, 3 & 4 Braised Tuna

As I’m not particularly fond of tuna, but realise it is important to take in during the hCG Diet, I found this recipe which I thoroughly enjoy.  I’ve adapted it many different ways using various veg, and it is always tasty and delicious, so do play around with it.

Ingredients:

4   250gm Tuna Steaks/Filets

2 Tablespoons coconut oil

2 Tablespoons finely minced/chopped onion

2 sticks of celery, finely sliced

1 small tomato, skinned & roughly chopped

1/2 teaspoon thyme

12 Tablespoons dry white wine (Leave this out for phase 2 and adapt by using Unsweetened orange juice – I find this a good alternative for this specific recipe)

Salt and pepper

Cooking Method

Heat 1 tablespoon of the oil and gently fry the onions and celery until soft. Stir in tomatoes and thyme and cook for about 5 minutes to soften tomatoes. Place in base of shallow dish. Heat remaining oil and quickly fry the tuna steaks to brown on each side. Place tuna steaks on top of vegetables, season; then pour over white wine. Cover. Bake at 160°C for 40-50 minutes until fish is tender.

Serves 4.   Zero carbs.