hCG Diet Thai Red Curry Prawns

Thai red curry prawns in a white bowl - hCG diet weight loss recipe

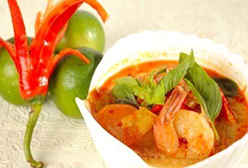
One of my most favourite dishes which I eat with Cauliflower Rice or Miracle noodles, as you wish.

Ingredients

  • 12 medium sized green prawns peeled & deveined but with the tails left on
  • 1 tbsp extra-virgin olive oil or coconut oil
  • 1 tbsp red curry paste
  • 1 medium onion chopped
  • 1 tsp ginger finely chopped
  • ½ cup coconut milk
  • 8 green beans chopped
  • 8 mushrooms sliced
  • ½ small red capsicum sliced thinly
  • 2 tsp fish sauce
  • 1 tbsp lime juice
  • ¼ cup fresh coriander
  • ¼ tsp stevia powder optional
  • 6 basil leaves for garnish

Instructions

  • Heat olive oil in a frying pan over a high heat. Add green prawns, ginger, onion and cook for 2-3 minutes or until cooked through and set aside.
  • Reduce the heat to medium. To a saucepan add red curry paste, coconut milk, fresh lime juice, stevia, fish sauce, green beans, mushrooms, capsicum and cook for 5 minutes.  Add prawns, stir until reheated. Add a little water if more liquid is preferred. Remove from heat and stir in fresh coriander leaves.  Ladle into bowls and garnish with basil leaves.

hCG Diet Spiced Chicken with Black Cumin Seeds

This shows just how under-rated Garam Masala is as a marinade, and illustrates beautifully the wonderful flavour of black cumin – make sure you use the true jeera kala, not nigella seeds. It’s an easy meal to put together at the end of a busy day, and if you don’t have any ground almond to provide a little thickening, just mix the garam masala with a little plain flour when you coat the chicken.

Ingredients
Serves: 3 

  1. 4 boned chicken thighs, trimmed no skin
  2. 1/4 teaspoon medium chilli flakes
  3. 1 teaspoon black cumin seeds
  4. 2 spring onions sliced
  5. 1 garlic clove crushed, or a pinch of garlic powder
  6. 1 tablespoon coconut oil
  7. 1/4 cup tomato puree
  8. 1/2 cup plain yoghurt
  9. 1 teaspoon ground almonds
  10. 1/4 tsp himalayan salt
  11. 1 teaspoon fenugreek leaves

Directions

  1. Pat garam masala onto all sides of the chicken and marinate 30 minutes.
  2. Heat pan, dry roast black cumin seeds and chilli flakes for 1 minute.
  3. Add oil, spring onions, garlic and chicken, and brown chicken on both sides over high heat.
  4. Remove chicken to a plate, reduce heat and add tomato, yoghurt, salt, almonds and fenugreek leaves. Simmer, stirring, for 4-5 minutes.
  5. Return chicken and any juices to pan and simmer until cooked through.
  6. Serve with rice.

Additional Tips

Whenever we cook this lovely Indian-inspired dish, we find it so tasty that we wish we’d made more. The recipe can easily be doubled so that we have left-overs!

hCG Diet Green Salad with Chicken and Rooibos

green salad with chicken and rooibos

Ingredients

Chicken

1 tsp (5 ml) coconut oil

2 chicken breasts on the bone, skin removed

1/3 cup (80 ml) rooibos tea

1 bay leaf

Salad

1/2 tbsp (7,5 ml) prepared mild mustard

3 tbsp (45 ml) lemon juice or white grape vinegar

1 tsp (5 ml) liquid stevia

1 tbsp coconut oil

1/2 tsp (2,5 ml) dried origanum

black pepper to taste

100 g broccoli, cut in florets

1 cup (250 ml) frozen cauliflower

1/4 cucumber, halved and sliced

large handful mixed lettuce leaves

Method

1. Chicken: Heat the oil in a large frying pan over a medium heat and fry chicken on both sides until golden brown.

2. Reduce heat, add tea and bay leaf. Cover with a lid. Simmer for 20-25 minutes or until just cooked. Spoon out and allow to cool. (Freeze the pan juices and use as a stock for another meal.) Remove the bones from the chicken and shred the meat.

3. Salad: Mix mustard, lemon juice, stevia, oil and origanum and season with pepper. Pour some of this mixture over the chicken to marinade the cooked meat.

4. Pour boiling water over the broccoli and cauliflower. Allow to stand for 7-10 minutes or until cooked. Drain and repeat if necessary. Rinse well to cool.

Chili Recipe for the hCG Diet.

Ingredients

  • 100 grams lean ground beef (less than 7% fat)
  • 1 cup chopped tomatoes
  • 1/2 cup water
  • 2 Tbs. minced onion
  • 2 cloves garlic crushed and minced
  • Pinch of garlic powder
  • Pinch of onion powder
  • 1/4 tsp. chili powder
  • Pinch of oregano
  • Cayenne pepper to taste (optional)
  • Salt and pepper to taste

Steps

Directions:

Brown ground beef in a small frying pan, add onions and garlic. Stir in tomatoes and water. Add spices an simmer slowly until liquid is reduced. The longer it cooks, the more tender and flavorful. Add a little water as needed to prevent burning. Serve with chopped green onion or tomato garnish and salt and pepper to taste

Makes 1 serving (1 protein, 1 vegetable or fruit)

P3 modifications: Top with cheddar cheese and a dollop of sour cream.

hCG Homemade Kombucha That’s Easy And Cheap

Recipe:

  • 4-8 bags of black tea or 4-8 teaspoons of loose leaf black tea
  • 1 gallon of water
  • 1 cup organic cane sugar 
  • 2 SCOBYs (you can take one and split it or cut it – they’re layered almost like a bunch of pancakes)
  • 1-2 cups starter tea from previous batch

Instructions:

  1. If you bought your SCOBY, follow the instructions given to you to start your homemade kombucha.
  2. Bring to boil a gallon of water. I just pour 2 half gallon mason jars’ worth of water into my stock pot so I don’t have to bother with actually measuring anything.
  3. Add sugar and stir until dissolved. Add tea and remove from heat to cool. Too hot of tea will kill your SCOBY. My mom puts her pot out in the snow sometimes to cool off quicker. If you’re concerned about caffeine you can steep your tea for 30-60 seconds in a cup of hot water before putting in with your sugar water.
  4. Take your starter tea and swirl it around your half gallon mason jars and let it settle in the bottom. The starter tea is acidic and will help your new tea become acidic enough so mold does not grow on your SCOBY. It will act as sort of an all-natural disinfectant.
  5. When tea has cooled enough, pour it into your mason jars with your starter tea. I usually will wait several hours until I can hold my finger in my tea brew.
  6. Place your SCOBY on top of tea and securely cover with thin cloth or paper towel. Your SCOBY will float all over the place as it ferments. The fermentation process is aerobic and needs the air to do its duty. Don’t use anything like cheesecloth because those pesky fruit flies will be able to get into your brew.
  7. Place mason jars in a corner of your kitchen without direct sunlight and let it ferment for several days. The hotter your house is the faster it will ferment.
  8. Start tasting your kombucha on the 4th day to see if it has reached the right balance of sweet and tart. I let my kombucha ferment for about 5 days in the summer and about 7 in the winter. The longer you let it ferment, the less sugar your kombucha will have but it will turn and taste progressively more like vinegar. Ain’t nobody want to drink that.
  9. After your kombucha has reached the right balance of sweetness, start making another batch of tea (steps 1-3), take your SCOBY out and put it on a plate, strain your kombucha while pouring it into another mason jar. Keep about 2 cups for your starter tea! Put the lid on the finished kombucha and put it in the fridge.
  10. Using your new starter tea, repeat steps 4-9.

Flavoring your homemade kombucha (aka second ferment) which is optional:

  1. After your first ferment (when your kombucha is the right taste), take your SCOBY out and put it on a plate. Then add your flavoring!
  2. For flavoring you can add fruit juice, fresh fruit, frozen fruit, dried fruit, spices, herbs, and whatever else you can think of. This is the time to experiment!
  3. Cover jars with a lid and put it back in the corner of your kitchen for another couple of days. Covering your jars produces carbonation because the carbon dioxide (made from the yeast eating the sugar) can’t escape. Don’t let it go too long with covered jars in case of exploding glass. We leave ours for about 4 days.

Tah dah! You have finished your first successful batch of homemade kombucha! You’re now officially a hippie.

A SCOBY is a syntrophic mixed culture of yeast and bacteria used in production of several traditional foods and beverages

hCG Diet Dragon Fruit Smoothie

This Dragon Fruit Smoothie is jam-packed with antioxidants, and is incredibly easy to make. I love how vibrant the color is, especially since it makes my kids want to drink it, too!

  1. Add raspberries, dragon fruit, blackberries, yogurt, chia seeds, lime, and ginger to blender container. Add milk, cover, and blend on high until smooth.
  2. Pause to scrape the sides of the container with a spatula as needed.
  3. Pour smoothie into a glass and top with additional chia seeds and berries if desired.

hCG Diet Baked Pears with Greek Yoghurt

Ingredients

  • Pears
  • 1/2 cup (120ml) stevia liquid
  • 1/4 teaspoon ground cinnamon
  • 1 teaspoon pure vanilla extract
  • optional toppings:  Greek yogurt

Instructions

  1. Preheat oven to 190°C. I don’t line my baking sheet when I make these, but you absolutely can with parchment or a silicone baking mat.
  2. Cut pears in half, then cut a small sliver off the underside so the pears sit flat when placed upright on the baking sheet. See video above for visual. Using a scoop or melon baller (or even a teaspoon), core out the seeds. Arrange pears, facing up, on the baking sheet. Sprinkle evenly with cinnamon– feel free to add more cinnamon if you’d like.
  3. Whisk the stevia liquid and vanilla extract together in a small bowl. Drizzle most of it all over the pears, reserving about 2 Tablespoons for after the pears are finished baking.
  4. Bake pears for about 25 minutes until soft and lightly browned on the edges. Remove from the oven and immediately drizzle with remaining mixture. Serve warm yogurt. Store leftovers in the refrigerator for up to 5 days.

Notes

  1. Make Ahead Instructions: Pears are best baked right before they are served, but you could bake them completely and refrigerate for up to 5 days. Then, warm back up in the oven for 10 minutes and top with remaining maple syrup mixture, granola, and yogurt right before serving.

hCG Diet Phase 2 Creamy Lime Coleslaw


INGREDIENTS
4 cups coleslaw mix
1.5 cups fat free greek yogurt
3 tbsp lime juice
1/4 tsp lime zest
3 tbsp fresh chopped cilantro
1 scoop powdered stevia or to taste (1/32 tsp per scoop)
1/8 tsp black pepper
1/2 tsp himalayan salt
1/4 cup green onion chopped

INSTRUCTIONS

  1. In a small bowl, mix Greek yogurt, lime juice, lime zest, cilantro, stevia extract, pepper and salt.
  2. Place coleslaw mix in a large bowl and add yogurt mix. Toss to evenly coat coleslaw in the dressing.
  3. Divide into two bowls and garnish with chopped green onion

RECIPE NOTES

Add grated apple to the mix to make a complete protein, veg, fruit meal

Sweet And Crunchy Salad with Cottage Cheese and Mandarins – Bettabods Phase 2 Recipe

INGREDIENTS

  • 1 cup cottage cheese (100g per 3.5 oz) fat-free
  • 1 cup celery diced
  • 1 cup mandarin  diced
  • 1/16 tsp powdered stevia
  • 1/2 teaspoon cinnamon
  • 1/4 teaspoon nutmeg
  • 1 teaspoon vanilla extract

INSTRUCTIONS:

  1. Mix cottage cheese, stevia, cinnamon, nutmeg and vanilla in a medium bowl
  2. Fold in celery and clementines
  3. Serve chilled.

NOTE:

This salad can be made with any of the allowed fruits on the Bettabods Diet Protocol.

hCG Phase 2 3 4 Curried Cauliflower

I’m always looking for different ways to prepare my veg, and this is one dish I came accross, tried out, and thoroughly love.

Hope you like it too.

Ingredients

1 large head cauliflower, broken into small florets

1 can weighless cream of chicken soup

3/4 cup homemade hCG mayonnaise

1/4 cup skimmed milk

2 teaspoons curry powder

10 melba toast

1/4 cup melted coconut oil

Directions

Preheat oven to 175 degrees C.

Place cauliflower in a steamer over 1 inch of boiling water, and cover. Cook until tender but still firm. Drain, and place in a greased casserole dish.

In a large bowl, mix together soup, mayonnaise, milk, and curry powder. Pour over cauliflower. Crush the melba, and mix with coconut oil. Sprinkle over cauliflower.

Bake in preheated oven for 30 minutes.

If single, portion it out and freeze the rest.