¼ c. Fat Free Mayonnaise (Preferably use your own homemade hCG Mayo) ¼ c. Fat Free sour cream 1 T. Dijon mustard 2 green onions, finely chopped 2 t. ground horseradish
Procedure:
Place all ingredients in a small bowl and mix until well blended.
Refrigerate. Serve over steak, or meat of your choice; also makes a good dip for vegetables.
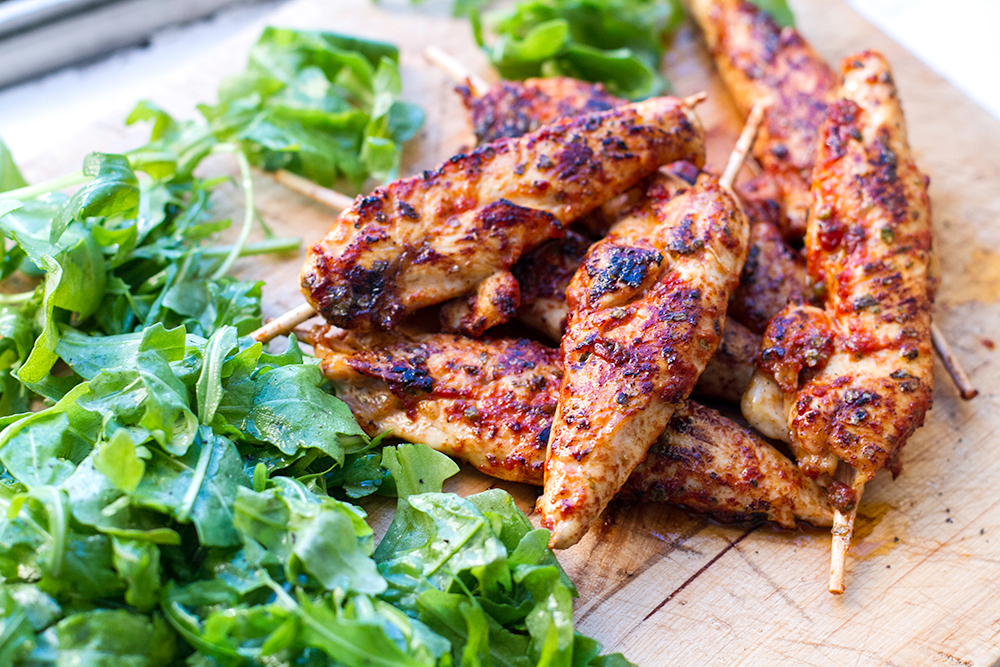
This quick and easy meal will please both the kids and the grown-ups. Chicken is marinated in a tasty mixture of marjoram, tomato paste and garlic, and served with a side of green salad and broccoli. I used chicken tenderloins because the meat is very succulent and soft but chicken breast or pork can also be used.
NGREDIENTS
1 tablepsoon dried marjoram (or freshly chopped)
1 tablespoon tomato paste
1 garlic clove, finely chopped
2/3 teaspoon sea salt
2/3 tsp ground black pepper
2 tablespoons virgin olive oil
8 chicken tenderloins + bamboo skewers
ghee for cooking (coconut oil or duck fat can be used instead)
4 cups rocket or other green leaf salad + lemon and olive oil
2 cups broccoli florets
1 teaspoon butter or olive oil
INSTRUCTIONS
Combine dried marjoram with chopped garlic, tomato paste, olive oil, salt and pepper and rub over chicken tenderloins skewered on bamboo sticks. The sticks are optional, you can simply marinate chicken strips. Set aside for a few minutes. At the same time, set a saucepan of water to boil.
Heat a littlecoconut oil in a large frying or grill pan. Cook chicken skewers or strips for 4 minutes on each side. In the meantime, cook the broccoli in boiling water for 2-3 minutes and mix rocket salad leaves with lemon juice and coconut oil. Toss cooked broccoli with some coconut oil and a little sea salt.
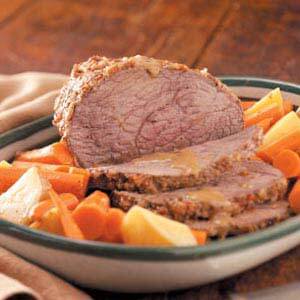
In an ovenproof Dutch oven over medium heat, brown roast in coconut oil on all sides; drain.
In a small bowl, combine the hot water and bouillon; add the ketchup, onion, Worcestershire sauce, caraway, salt and pepper. Pour over roast. Add bay leaves.
Cover and bake at 325° for 3 hours or until tender. Remove roast to serving platter; keep warm.
In a small bowl, combine flour and cold water until smooth. Stir into pan juices; bring to a boil. Cook and stir for 1-2 minutes or until thickened, adding water to thin if necessary. Discard bay leaves. Serve with cooked potatoes and carrots if desired.
There are so many reasons to use chamomile in cooking, you may never steep a dusty bag in hot water again. Forget tea — buy it in fresh bunches or dried in bulk. It’s neither hard to find nor expensive, and the fun you can have with this little yellow flower encompasses cocktails, dessert and even savory dishes. Fresh chamomile, also spelled camomile, even serves as a sharp-looking table decoration, so acquire some of these daisy-like plants and use them in every way possible.
WHERE IT’S FROM
As with most plants, there are numerous types of chamomile out there, from a wild version known as pineapple weed to scent-free field chamomile to the Moroccan variety found growing in the salty soil by the Mediterranean Sea. The most common of these flowers is the basic German type, followed closely by the Roman or English variety, which are the ones grown in North America and Europe. No matter which you decide to work with, they all hail from the family Asteraceae, and all impart a slight apple flavor and a floral quality that has helped the plant find its way into diets throughout history — it’s been harvested as a food and herb for thousands of years.
Before chamomile became a culinary staple and a famous tea, it was used mainly for medicinal reasons. Chamomile tea is traditionally drunk at night as a natural anxiolytic, which helps with anxiety and calms the mind and body. Chamomile also has anti-carcinogen properties and has been known to help with inflammation and to ease an upset stomach. The healing properties of chamomile were so prized in ancient Egypt that the plant was dedicated to the sun and worshipped. You can also find evidence of chamomile’s medicinal uses in the Lacnunga, an Anglo-Saxon manuscript dating back to at least the first millennium. In it, the flower is referred to as the one of the “nine sacred herbs.”
WHEN IT’S IN SEASON
You can find this plant growing all over the world. Typically it blooms twice, once in the spring and once in the summer, and soon after each blossoming the plant is harvested. Some regions pick the flowers as they come, like in Egypt, where they harvest every seven to ten days with a special rake. It’s this hands-on practice that makes Egyptian chamomile prized above others. Other regions might only cull the blossoms two or three times in a growth cycle.
WHAT TO LOOK FOR
You can buy chamomile dried or fresh, though unless it’s the right season you won’t find just-picked flowers. When buying dried, make sure you are getting whole flowers, not just fine-grained plant dust. It’s fine if they’re a little crumbly, but you should see button-like buds and a mixture of green and yellow leaves and petals.
HOW TO STORE IT
Store dried chamomile like any herb, in an airtight container out of direct sunlight. If you have a fresh plant, you can put the ends in a cup of water just as you would any cut flowers.
HOW TO PREPARE IT
It may surprise you just how many things you can do with chamomile. For example, at Juni in Manhattan, pastry chef Mina Pizzaro infuses the flower into ice cream, highlighted with yuzu and ginger. “The flavor lends a natural gentle sweetness and pleasant floral notes to the dessert,” she says, adding that the spiciness of ginger and acidity of yuzu help to strike a perfect balance.
Chamomile works in non-dessert applications as well, as chef Craig Richards has done in Atlanta at St. Cecilia. His pièce de résistance: scallop crudo with chamomile-celery oil. “We decided to use chamomile because it’s a unique ingredient you don’t see very often in savory cooking,” he says. “It brings another element of acidity and herbal flavor that plays very well with raw fish, especially the natural sweetness of the raw scallop.” Richards has developed a technique for extracting the plant’s flavor as well. “We blend it for an extended period of time so that it heats up in the blender and releases its essential oil.” He also suggests making a dried chamomile and salt rub for fish and throwing some fresh blossoms in a spring salad.
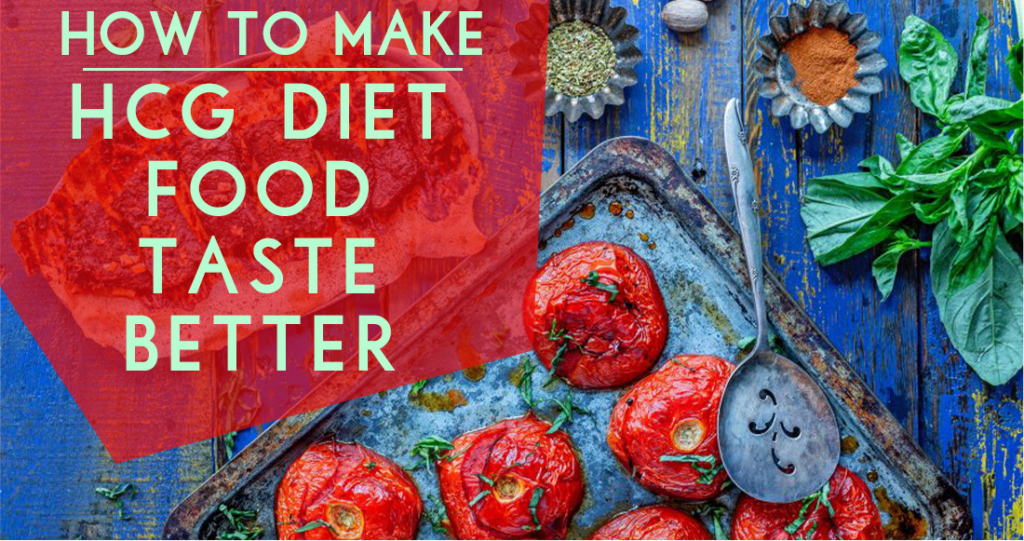
Sometimes most of us do well with the Phase 2 meals on the hCG diet tasting bland and boring. And if that’s you, so be it, stick with what works girl! But if you are really struggling to stick to the diet because of this lack of taste or getting sick of what you’ve been eating, here are some tips for really improving the flavor, texture, and variety of your P2 hCG Diet meals – we utilize all these tips in our hundreds of recipes.
0. BONUS TIP ZERO: CLEAN LOAD
Our detox phase is especially a good idea if you are a sugar addict like me. The sooner you clean your palate from sugar, the sooner you will not only have less cravings (which is honestly the biggest reason we overeat or eat the wrong stuff) but, cleaner food will taste better. You know how I know? If you eat a bowl of ice-cream, immediately followed by some bites of kale salad, you will be like, ummm no thanks, I’ll stick with ice-cream. But once your palate gets cleansed and gets away from super concentrated sugar and fat combos, all of a sudden the same kale salad tastes pretty good.
1. SALT
Use enough and use it in the right way. You would be so amazed at how much flavor isn’t there when you don’t put enough salt to bring that flavor out. It’s a real thing. I always wondered if I just liked the taste of salt itself because I find myself salting quite a bit before the dish I’m eating tastes good to me – the salt is actually enhancing the other flavors you’ve used- the spices, herbs, and the food itself- the salt greatly enhances you’re ability to taste those flavors. “Salt has a greater impact on flavor than any other ingredient.”
That’s powerful! It’s “primary role is to amplify flavor. Salt unlocks flavor – flavors and aroma that your palate will not pick up at all without proper salting. One example she gives,“This flavor ‘unlocking’ is one reason by professional cooks like to season sliced tomatoes a few minutes before serving them – so that, as the salt helps the flavor molecules that are bound up within the tomato proteins , each bite will taste more intensely of tomato.”
TYPE OF SALT TO USE
I find that using Pink Himalyan Salt is the best. It just seems to create a more natural balanced salted flavor than something like the white table salt.
WHEN AND HOW YOU USE & ADD SALT MAKES A DIFFERENCE
Vegetables:
15 min in advance Simmering/Blanching veggies in salty-like-the-sea water. And if it seems like a lot of salt, the author said to remember you are throwing MOST of that salt away with the boiling water once the veggies are cooked! Salting veggies that have lots of water like tomatoes, zucchini, etc, before grilling or roasting (pat them dry with whatever whatever the salt pulls out during this sitting time).
Chicken, Beef, Turkey, other non-seafood meats:
sprinkle with salt 20min-1hr before cooking for the salt to diffuse into the meat so that your meat will taste more evenly flavored/salty (vs just salty on in the inside and bland on inside). It actually suggested, if you’re thinking ahead, to season the meat with salt a full day before cooking, and let the salt diffuse into the meat in the fridge overnight.
Seafood:
the book says these proteins are more delicate and it’s best to salt these no more than about 15 minutes prior to cooking, otherwise this process can make the resulting meat tough.
Eggs:
Eggs absorb salt very easily and if you add a little salt to your egg mix prior to cooking this will also help the eggs retain their moisture, along with tasting more flavorful!
CONCERNED ABOUT SODIUM INTAKE?
If you are concerned about the connection to be salt and health, like many other food/diet conclusions from the 50/60/80’s/90’s felt we should follow low-sodium diets- may now believe that salt is indeed quite good for you and is not the cause of many of the things that people believe back then. Additionally, the kind of salt you use makes a big difference. Sea salt is now highly advised and you get a wide range of minerals this way.
BENEFITS OF SALT:
Is salt really bad for you?
The American Journal of Hypertension found no strong evidence that cutting salt intake reduces the risk for heart attacks, strokes or death in people with normal or high blood pressure.
In May European researchers publishing in the Journal of the American Medical Association reported that the less sodium that study subjects excreted in their urine—an excellent measure of prior consumption—the greater their risk was of dying from heart disease.
“There was a 9 week study involving Himalayan pink sea salt and the conclusion of that study mentioned,“saw significant positive changes in respiratory, circulatory, organ, connective tissue and nervous system functions, as measured by the IMEDIS System.
These participants also reported increases in the quality of sleep, energy and concentration levels, brain activity, sexual activity, weight loss, enhanced consciousness and noticeable nail and hair growth and a few reported that they felt as if their physical and emotional beings were being cleansed.”
In fact, if you have adrenal fatigues issues, salt is important for treating this. There are treatments involving drinking salt water.In fact one thing I’m doing right now is drinking some Sole Water every morning right now, which is water saturated with the salt from larger himalayan salt rocks.
Obviously there is such a thing as oversalting, but most of us undersalt, and if you are eating a meal or recipe and it tastes flavorless to you, the quickest way to fix that usually is going to be to try adding some salt and or sour source (ie lemon/lime/vinegar- more on that later).
2. USE STINKY STUFF
FISH SAUCE
This I learned from a Thai cooking class I took years ago. It was my first foray into the use of fish sauce. There are just certain foods you smell that frankly, seem to belong in the garbage. You think moldy cheeses smell bad? Open a bottle of fish sauce and take a whiff. You won’t thank me.But somehow, using a little fish sauce as part of your salt source (it’s very salty) can totally change the savouriness of a dish – and not in a stinky way!
In a good way- have you heard about the 5th taste? Umami? It’s meant to indicate a savoury taste that is added and ingredients that bring an umami taste to dishes are things like fish sauce, cheeses, and mushrooms. You haven’t had the best burger patty in the world until you’ve had one with a little fish sauce or soy sauced added to the meat mixture,
I promise! You could consider fish sauce as (AP) Alternate Protocol, but when you consider that fish and many seafoods are allowed on the original (SP) Simeons Protocol, I feel like this is basically the same thing. Your choice of course!
2 THINGS TO NOTE ABOUT SELECTING A FISH SAUCE:
1. Look for one without sugar- many brands do contain added sugar, but not all. The more traditional brands typically do not.
Red Boat fish sauce is a well known brand that has only anchovies and sea salt added to it, and no MSG or other preservatives.
2. It’s considered a salt source so you will not need as much salt if you use fish sauce as part
3. If you are wondering if this is SP (specific protocol) just think that fish sauce is just fermented fish (anchovies) and has only 16 calories, 2 carbs and 0 fat per tbsp and you would likely only consume about 1 tsp or so per serving – 5.5 calories, .6 carbs per serving.
VINEGAR
Vinegar too tends to have a bit of an off-putting stinky smell, but can really heighten and enhance flavors – for us vinegar is one of the few liquids we even have to work with since oils are out for most of us (outside of a little coconut oil if you are AP). But we’ll cover more about vinegar under the “sour stuff” point.
3. USE PICKLED STUFF
Using ingredients that have been pickled in vinegar can add a contrast of “brightness” to your dish. Add them as a garnish or topping to many of your P2 meals to add flavor.Caution here: many pickled items are pickled with sugar- it’s best to “quick pickle” things yourself with just vinegar (and you could use a little stevia too if you like!
For quick pickling, you’ll want to chop the veggies small so the vinegar solution can diffuse into the pieces quickly and easily. You can do this with pretty much any P2 vegetable- radishes would be delicious this way!Here’s a great recipe from another food bog with great ideas:
4. USE MORE SPICES AND DRIED HERBS. MORE. YEP, STILL MORE.
Whether you need to do this will depend on how you were raised. But I was raised in a traditional 1980’s household where the recipes my mom followed from various “cooking light” magazines included things like 1/4 tsp Italian seasoning for a spaghetti sauce that’s supposed to serve 4.
Yay. You mean I get to have 1/16th of a tsp of spice flavor in my serving? Wood whoop. Oh wait, except I didn’t know I COULDN’T TASTE IT. Upside- I suppose we saved a little money on groceries.
In my early twenties Indian food places started getting popular where I lived and after enjoying some curry dishes for the first time, I went home and looked up some commonly made Indian recipes. I was shocked to find the instructions telling me to add 1-2 tbsp of paprika, cumin, and turmeric at a time for a recipe to serve a family. And it was REALLY good. So instead you will find in many P2 recipes, we use a higher amount of various spices.
5. FRESH HERBS
Now that we’ve discussed stopping with the 1/16 tsp of dried herbs and spices for a family of 4, let’s discuss fresh herbs.Fresh herbs – wow. Makes a difference.
This is one reason Pesto and Chimichurri sauces tastes SOOOOO good.For me anyway, I tended to shy away from this because of the cost of fresh herbs and I didn’t realize just how much a difference in flavor and taste it could make.
One suggestion to save on cost is to buy just 1 or 2 Bunches of fresh herbs and make recipes that week that use that same herb- ie fresh cilantro, or fresh Italian flat leaf parsley, or fresh rosemary. That way you will use it all up and it won’t go to waste and you won’t feel like you wasted just for 1 tsp. Of fresh rosemary.
Tips for this:
1. Some herbs are pretty inexpensive- usually:Cilantro Parsley Mint Basil
2. Extend the life of your fresh herbs by keeping them in a sealed bag in the fridge with no air inside the bag.
6. USE SOUR STUFF: LEMON SQUEEZES AND VINEGAR SPLASHES
I seriously used to see those instructions and think that’s just something restaurants do that doesn’t really matter. Boy was I wrong! Finishing something with just a little squeeze of lemon or lime once the food is off the stove and ready to eat can make SUCH a difference in the flavor!With things like vinegar, the idea is that a little splash can really sharpen and enhance a dish if it’s tasting flat – the goal isn’t to taste the vinegar, it’s to add just enough to bring the dish a little more to life
On hCG, for things like salad dressings often all we have is vinegar without the oil to temper the taste. Vinegar can be used in ways that might surprise you!
7. TENDERIZE YOUR MEAT
A very common complaint on the hCG diet is tough meat- especially lean beef cuts. This make the food really hard to enjoy when the texture is just really hard or chewy or yuck.In my research, I discovered there is a way to tenderize those tough cuts of meat! It’s 1 little extra step that you can do when you feel like it.
SOAK YOUR RAW MEAT IN A BAKING SODA SOLUTION FOR 15 MINUTES.
What it does is:
Prevents proteins from bonding too much during cooking.How to do it: The consensus is about 1 tsp of baking soda per 1 kig of meat.Cook’s Illustrated article on this subject mentions that “briefly soaking meat in a solution of baking soda and water raises the pH on the meat’s surface, making it more difficult for the proteins to bond excessively, which keeps the meat tender and moist when it’s cooked.
HOW TO DO IT
1. Marinate raw meat in a solution of baking soda + enough water to cover the meat for 15 minutes (1/4 tsp per 100g).
2. THOROUGHLY rinse the raw meat with water before cooking. You want to get all the baking soda off now.
Notes:
It’s okay to leave the baking soda on longer, but it does not further improve the texture beyond just doing it 15 minutes.
It was noted that meat with more surface area to penetrate, like ground meat, may be best to use less baking soda or else it might be a bit too much and taste of baking soda.
This works best for thin cuts of meat – which in general will work well for us since we are using small cuts of beef on this diet.
This works well with chicken breast too- while chicken breast isn’t terrible on it’s own, I did read that using this method really did improve the moisture and texture of the chicken.
Seafood doesn’t need this since it’s already plenty tender.
8. CHOP VEGGIES SMALLER OR IN DIFFERENT CUTS
There was a time when the idea of eating vegetables was a serious turn off because I was so addicted to chocolate. Outside of getting over the withdrawal period of eliminating sugar which greatly changes your taste perceptions, I found the CUT/SIZE of vegetables to make a great difference to me in palatability.
Small or thin pieces of raw veggies (or cooked) seem to be much more enjoyable to eat than big huge chunks.Ways to make cutting veggies smaller easier and unique cuts
1. Most grocery stores now carry veggies in those nice “riced” cuts.
2. Spiralizer – you can make vegetables noodles with this nifty tool
3. Food processor – ninja one – you make “rice” out of your most veggies this way.
4. Mandolin – I love how the mandoline slicer can cut thin, matchstick style cuts very quickly. Many are scared of this, but I have a video tutorial on how to use it safely and properly,
After trying several of these now while creating the P2 hCG recipes, including higher-end ones which you would assume would perform better, this plastic one cuts the best honestly.
5. A nice sharp knife
6. Vegetable peeler – a little more laborious, but you can use these to shave ribbons and “noodles” of veggies as well.
9. NO CALORIE OR LOW CALORIE STUFF TO STAY SANE
A. SHIRITAKI NOODLES
Shiritaki Noodles ~ I used them daily on most of my rounds. There are lots different noodle flavour noodles, which are really fun and can be purchased at most health shops and Woolworths as well as Dischem.
C. SUPER LOW CALORIE SAUCES AND DRESSINGS
Mine are obviously home made and you would need to find some nice sugar free, fat free and gluten free recipes for your sauces and dressing
I love using the low sodium Balsamic Vinaigrette and I make a super Sweet Barbecue Sauce using Stevia.
10. CARAMELIZE/ROAST VEGGIES
When you caramelize your veggies it brings out the natural sweetness it has and really changes the flavor profile – in a yummy way. Usually this is done with oil in regular cooking, and I find the idea below does the job just as well. When you roast veggies, similar thing, both the flavor profile and texture changes significantly, giving you some variety in the taste and mouthfeel of what you’re eating on the diet.
TO CARAMELIZE VEGGIES ON P2:
Main tips for caramelizing:
1. Chop veggies thinly and evenly
2. Use very little liquid – like 1-2 tbsp of chicken broth at a time
3. Stir only occasionally and then let them sit for a bit so they can brown.
4. Deglaze as needed so stuff that sticks to bottom of pan doesn’t burn- this then cooks off and allows the caramelization process to continue
5. Use a large pan so there isn’t overcrowding- overcrowding leads to the vegetables steaming instead of browning.
6. This takes awhile so don’t rush it.Notes: the idea is to add only a little liquid at a time and let it brown, then add a little more liquid as needed so it can continue gradually browning rather than burning.
Tip: If you add a little salt to draw out the water from the veggies as well, this will then evaporate as you cook it and help it to brown and caramelize.
CARAMELIZING WITH INSTANT POT! WHAT WHAT??
You can also use a pressure cooker, in which case you can achieve a temperature high enough to create caramelizing/browning, even in a wet environment! This can make soups have more flavor doing in the instant pot vs. stovetop when not using oils.
ROASTING IN THE OVEN WITHOUT OIL TIPS:
Use a dark pan to get better browning
Use a pan large enough to prevent overcrowding- as mentioned above, more veggies releases more moisture and then this tends to steam the veggies rather than brown them which needs a more dry environment, especially when no oil is involved.
If you are adding herbs and spices to your veggies, spritz the veggies with water lightly help the herbs and spices adhere.
Baste your sheet of veggies with 1-2 tsp of broth at a time while cooking- use only as much as is needed so that you don’t get the steaming effect instead.
Roast at 375 for 45-60 minutes depending on number of veggies and your elevation. 10 minutes into the clock, lift and stir/turn the veggies from sticking. Periodically check the veggies over the next 35-45 minutes and turn as needed.
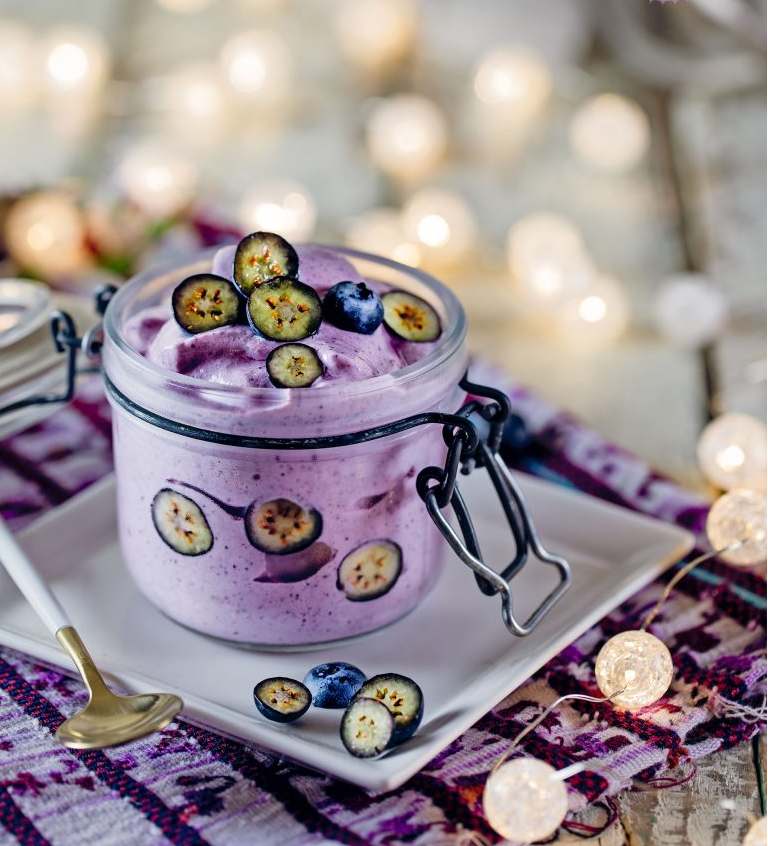
INGREDIENTS1 cup Blueberries fresh or frozen1 1/2 cups Greek yogurt fat-free – AP 1/4 tsp vanilla extract 5 scoops powdered stevia (1/32 tsp per 1 scoop)
INSTRUCTIONS
Add all the ingredients to a food processor or a blender and mix until smooth
Pour into a bowl or pan and freeze for at least 4 hours or until firm.
Scoop and serve, or re-blend frozen chunks in a vitamix for a nice soft-serve thing.
RECIPE NOTES
Any berries can easily be substituted in this recipe, use a mix of berries for a new type of yogurt. Peach blueberry also works well!
Once frozen, scoop the yogurt back into the food processor and pulse two or three times to give it a nice soft texture.
Scoop the frozen yogurt into a blender and add 1/2 cup unsweetened coconut milk for a great smoothie!
You can also freeze these in ice-cube trays and add them to the blender with some water if they are still fully frozen at the time you want to serve and eat them.
This is delicious!!! But don’t take my word for it- go try it out yourself! It feels like your having dessert on the hCG diet when in reality, you are mostly just eating ice and water.
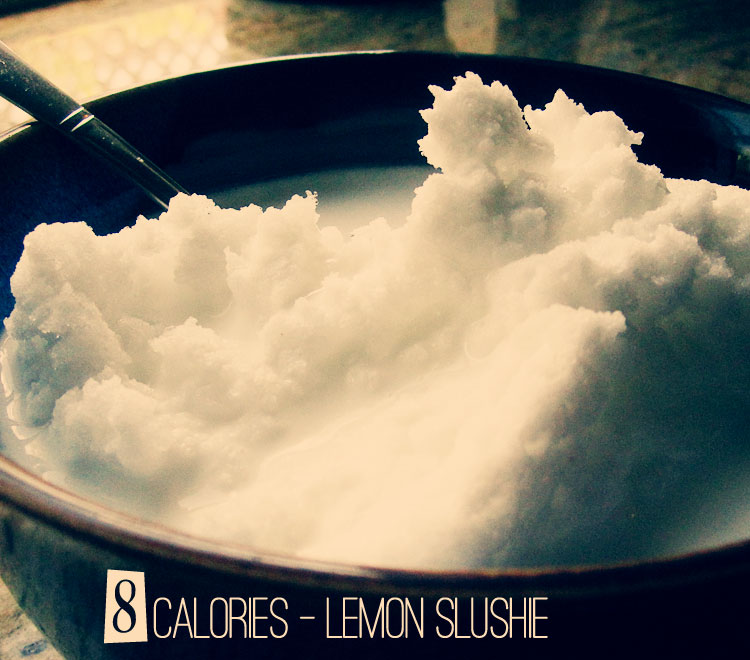
hCG Diet Phase 2 Lemon Slushie – just 8 Calories
LEMON JUICE (USUALLY 1/2 LEMON-1 LEMON’S WORTH) 1/3 CUP WATER 7-9 ICE CUBES STEVIA TO TASTE (ORGANIC STEVIA IS BEST MOST NATURAL TASTE)
All you do is blend it up all together- the stevia in it is what will create the great thick, frothy texture. If you don’t use stevia the texture would not be nearly as pleasant. I know the recipe is so simple that it might be like, why are you making a recipe for that? But honestly, that’s the very reason I needed to make it! It had never occurred to me that i could make something tasty to eat that was so simple with only 2 ingredients aside from water until I was desperate for something “yummy” on p2 of the Bettabods hCG Diet Protocol.
1 long red chilli, deseeded and julienned into long thin strips
½ cup coriander leaves
3 Thai shallots or small red onion, peeled and finely sliced
½ cup mint leaves
½ cup basil leaves
½ cup mint leaves
15 large cooked king prawns, peeled and deveined
METHOD
Place the garlic, chilli, ginger and sugar in a mortar and pestle of food processor, then add in the lime juice and fish sauce.
In a large bowl, add in the bean sprouts, long red chilli julienne, green papaya, cucumber, coriander leaves, Thai shallots, both mint leaves, Thai basil and the dressing to taste.
Serve on a platter with prawns and finish with toasted peanuts and fried shallots.
Note
Now you can also always adapt this recipe for phase 2 by leaving out things that are not allowed in that phase and adding in things that are.


